
 Counter-Strike 2
 Valorant
 Dota 2
 League of Legends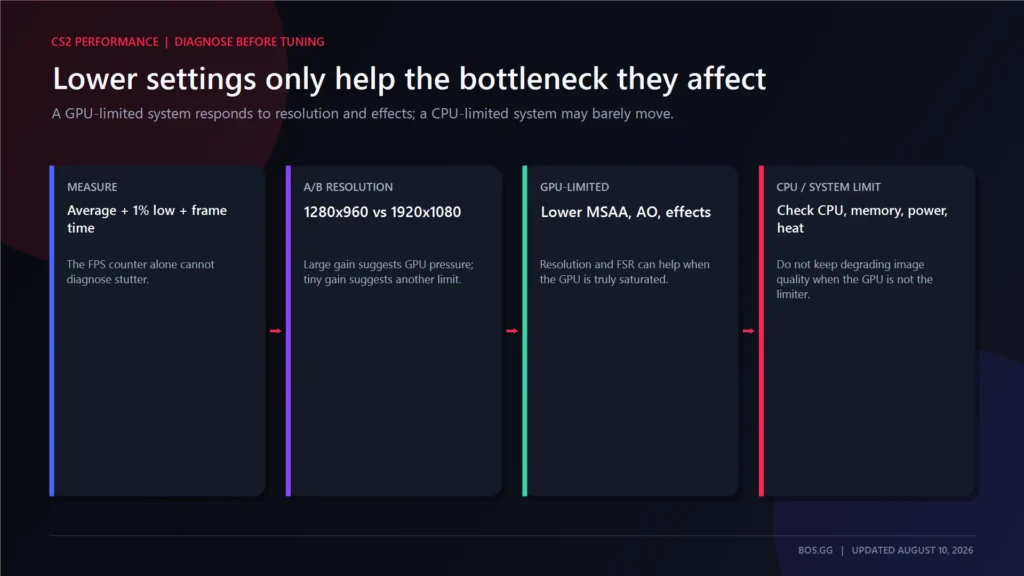
Fact-checked August 10, 2026.
A lot of CS2 performance guides still use settings copied from old CS:GO configs. The better approach is to reduce settings that create meaningful GPU load, preserve the visual information that helps you compete, and check frame-time consistency rather than chasing the largest FPS number.
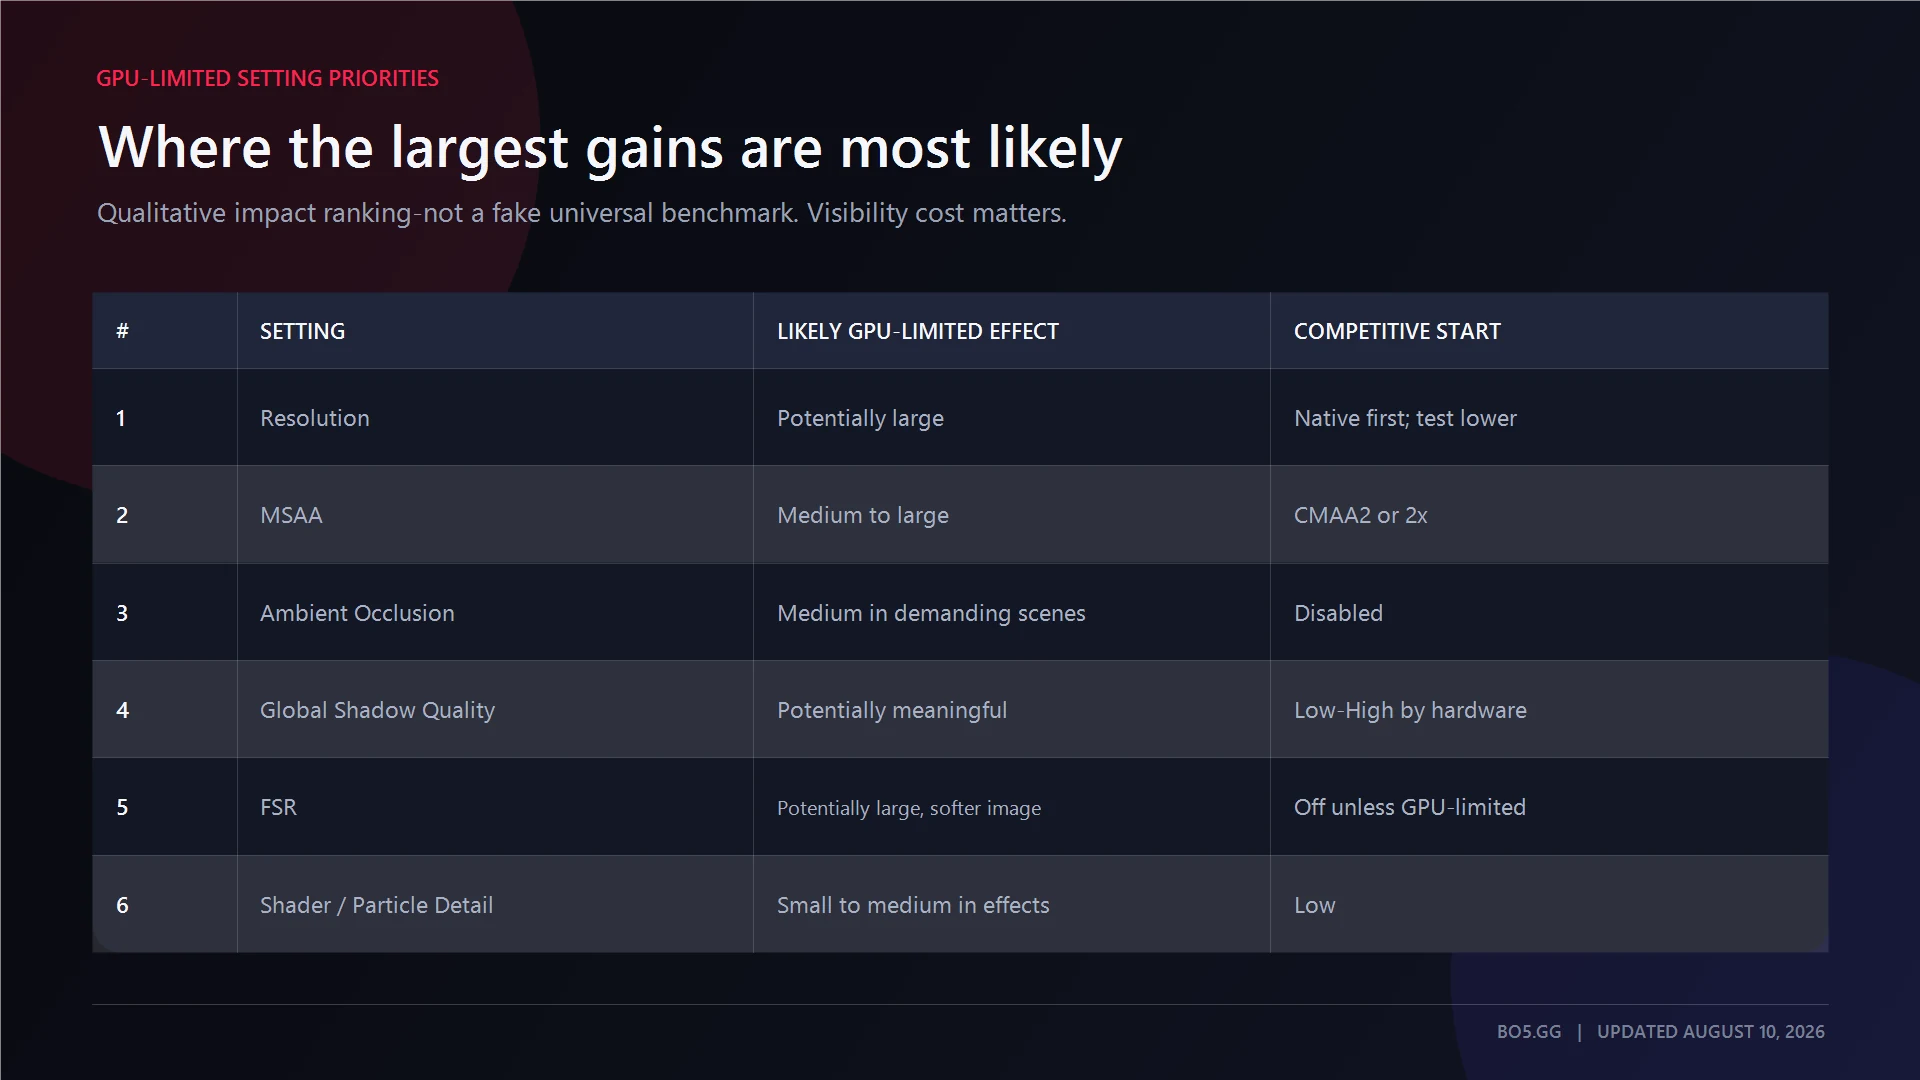
Answer: On most GPU-limited PCs, resolution, MSAA, ambient occlusion, and shadow quality have the greatest effect on performance. Moving from 1920×1080 to 1280×960 renders 40.7% fewer pixels, but it only raises FPS when the GPU is the bottleneck. Compare average FPS with 1% lows, and keep useful player shadows instead of disabling them for a small gain.
Key Takeaways
- Competitive starting point: Boost Player Contrast On, Dynamic Shadows All, Ambient Occlusion Off, Shader and Particle Detail Low, FSR Disabled, and NVIDIA Reflex or AMD Anti-Lag 2 Enabled on supported hardware.
- Lower resolution and MSAA first on a GPU-limited PC. They may change little when CS2 is limited by the CPU or memory.
- Use V-Sync Off for the absolute lowest input lag. Use a properly configured G-SYNC or FreeSync profile when tear-free motion matters more.
- Do not disable useful local-light player shadows just to add a few frames to the counter.
- Ignore CS:GO-era fixes such as
mat_queue_mode,cl_forcepreload,-threads, and old DirectX 9 launch options.
The CS2 Settings That Actually Raise Your FPS
The best setting to change depends on what is slowing down your system.
A GPU-limited PC normally responds to lower resolution, reduced anti-aliasing, disabled ambient occlusion, and simpler effects. A CPU-limited PC may show almost no improvement because the processor, memory subsystem, or game simulation is already controlling the frame rate.
Average FPS tells you how fast the game runs overall. A 1% low reflects performance during the slowest one percent of frames, making it more useful for spotting hitching and unstable frame pacing.
| Priority | Setting | Competitive starting value | Likely effect when GPU-limited | Visibility cost |
|---|---|---|---|---|
| 1 | Resolution | Native first; test 1600×900 or 1280×960 | Potentially large | Reduced sharpness and fine detail |
| 2 | Multisampling Anti-Aliasing | CMAA2 or 2× MSAA | Medium to large | More shimmering at lower levels |
| 3 | Ambient Occlusion | Disabled | Medium in demanding scenes | Less contact and depth shading |
| 4 | Global Shadow Quality | Low to High by hardware tier | Potentially meaningful | Lower fidelity or shorter shadow range |
| 5 | FidelityFX Super Resolution | Disabled unless clearly GPU-limited | Potentially large | Softer reconstructed image |
| 6 | Shader and Particle Detail | Low | Small to medium during effects | Simpler materials and particles |
| 7 | Model/Texture Detail | Low or Medium | Usually small until VRAM is constrained | Lower surface detail |
| 8 | Texture Filtering | 4× to 16× | Usually small on a discrete GPU | Blurrier angled surfaces at low values |
| 9 | Boost Player Contrast | Enabled | Normally small | Disabling can make targets harder to separate |
Changing from 1920×1080 to 1280×960 reduces the rendered pixel count from 2,073,600 to 1,228,800. That is a 40.7% reduction, but the 4:3 aspect ratio itself is not a special performance technology.
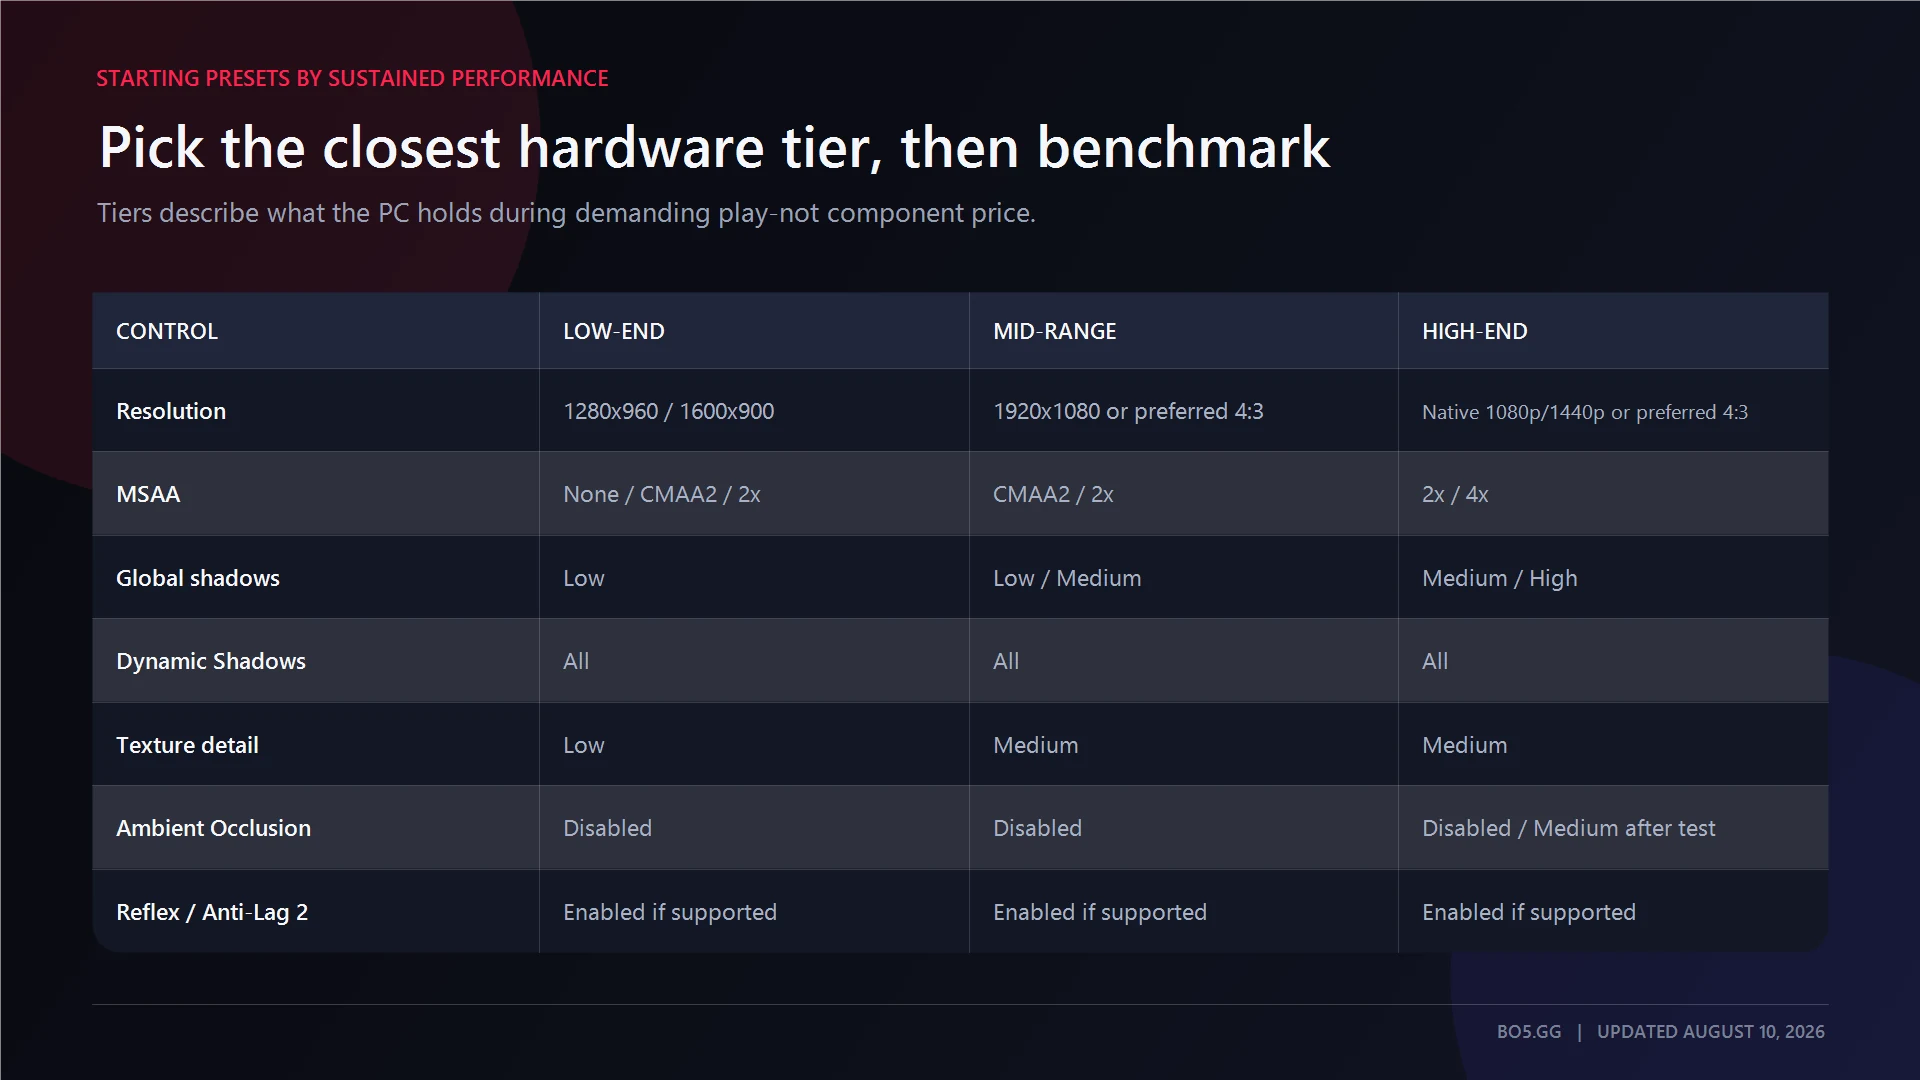
Starting presets by hardware capability
These are starting points, not universal configurations. The tier describes the performance your PC can sustain in a demanding match, not how much the components cost.
- Low-end: struggles to hold a 144 FPS 1% low at native resolution.
- Mid-range: can approach a 240 FPS 1% low with competitive settings.
- High-end: can target 360 FPS or more while retaining image-quality headroom.
| Setting | Low-end competitive | Mid-range competitive | High-end competitive |
|---|---|---|---|
| Resolution | 1280×960 or 1600×900 | 1920×1080 or preferred 4:3 resolution | Native 1080p/1440p or preferred 4:3 |
| Boost Player Contrast | Enabled | Enabled | Enabled |
| MSAA | None, CMAA2, or 2× | CMAA2 or 2× | 2× or 4× |
| Global Shadow Quality | Low | Low or Medium | Medium or High |
| Dynamic Shadows | All | All | All |
| Model/Texture Detail | Low | Medium | Medium |
| Texture Filtering | 2× or 4× | 4× or 8× | 8× or 16× |
| Shader Detail | Low | Low | Low unless testing supports higher |
| Particle Detail | Low | Low | Low |
| Ambient Occlusion | Disabled | Disabled | Disabled or Medium after testing |
| High Dynamic Range | Performance initially | Quality if its cost is negligible | Quality |
| FidelityFX Super Resolution | Off first; use only if GPU-limited | Disabled | Disabled |
| Reflex/Anti-Lag 2 | Enabled on supported hardware | Enabled on supported hardware | Enabled on supported hardware |
| FPS cap | Sustainable combat-level cap | Sustainable cap or VRR cap | High cap, uncapped, or VRR cap |
Dynamic Shadows stays on All across all three presets because local or artificial-light shadows can reveal an opponent before the player model appears. Reduce Global Shadow Quality or heavier GPU settings before removing that information.
Choose the latency profile that fits your display
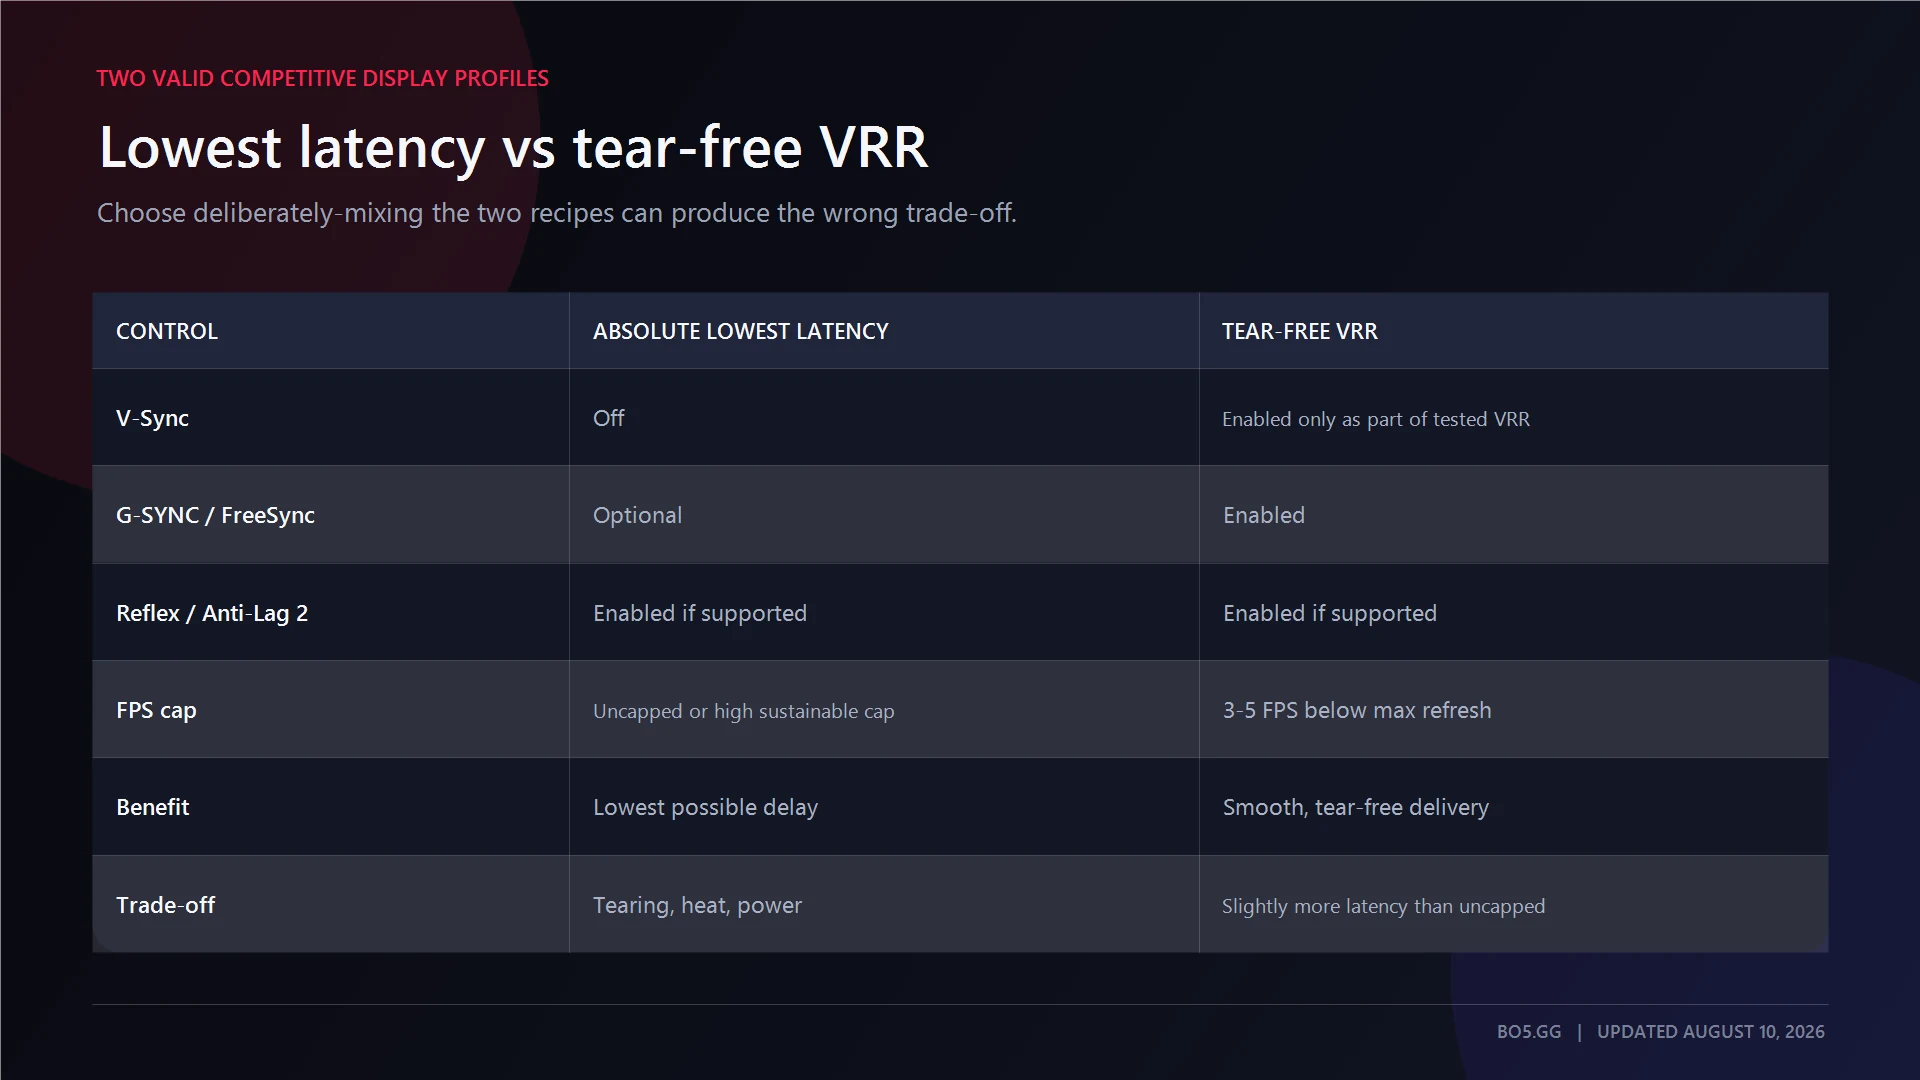
There are two valid competitive approaches. The right one depends on whether you want the lowest possible delay or smoother, tear-free presentation.
| Control | Absolute lowest latency | Tear-free VRR |
|---|---|---|
| V-Sync | Off | Enabled only as part of a tested VRR setup |
| G-SYNC/FreeSync | Optional | Enabled |
| NVIDIA Reflex/AMD Anti-Lag 2 | Enabled on supported hardware | Enabled on supported hardware |
| FPS cap | Uncapped or a high sustainable cap | Start 3–5 FPS below maximum refresh |
| Main benefit | Lowest possible delay | Smooth, tear-free delivery |
| Main trade-off | Tearing, heat, and higher power use | Slightly more latency than uncapped V-Sync Off |
An uncapped GPU can remain close to full utilization, use more power, and build a render queue. Reflex or Anti-Lag 2 can reduce that queue, but a controlled high cap may still provide better consistency on a particular PC.
For VRR, the below-refresh cap is only a starting point. Limiter overshoot, display behavior, and the monitor’s VRR range can require a wider margin.
The exact V-Sync route can also vary by GPU, display mode, and driver. Test the in-game and driver controls rather than enabling several overlapping synchronization settings without checking the result.
Best CS2 Video Settings, Setting by Setting
Resolution, aspect ratio, and refresh rate
Lowering resolution helps when it meaningfully reduces the GPU workload. If performance barely changes between 1280×960 and 1920×1080, the system is probably CPU-limited.
Aspect ratio changes the horizontal view and, when stretched, the perceived width of player models. Most of the performance difference comes from the number of pixels being rendered.
Select the monitor’s highest supported refresh rate in both Windows and CS2. Check it again after graphics-driver updates, monitor changes, cable changes, or switching laptop power profiles.
Test Fullscreen against Fullscreen Windowed on your own system. The gap between them is not as predictable as it was on older Windows versions, so neither mode should be declared universally faster without measurement.
Shadows and player contrast
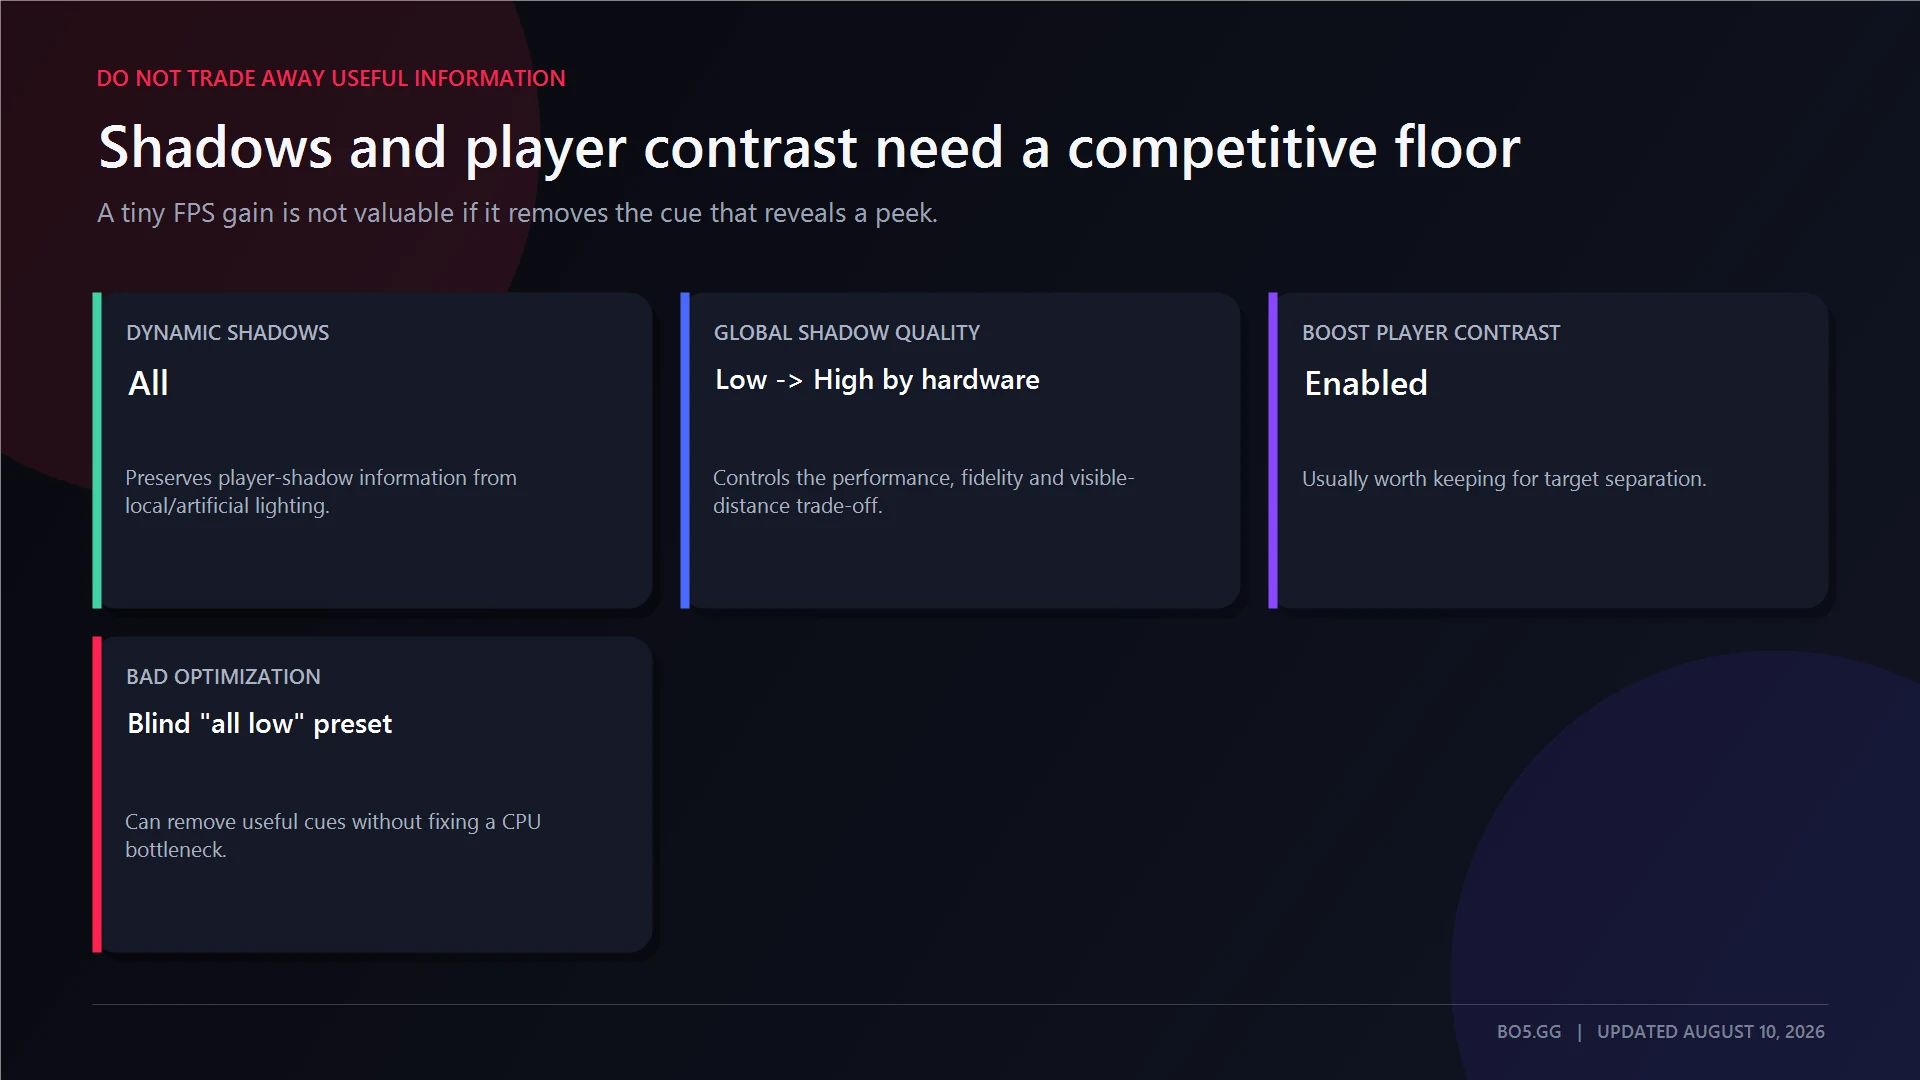
Use Dynamic Shadows: All as the competitive baseline. Sun Only may reduce some work, but it can also remove player-shadow information created by local or artificial lighting.
Global Shadow Quality controls the broader trade-off between performance, shadow clarity, and visible distance. Start with Low on a constrained PC, then compare Medium and High if the system has enough headroom.
Keep Boost Player Contrast enabled unless you find a specific performance or visual problem. It helps player models stand out from the background, which is usually more useful than a small theoretical FPS gain.
MSAA, textures, shaders, particles, and ambient occlusion
MSAA is one of the first settings to reduce when the GPU remains heavily utilized. CMAA2 or 2× MSAA is a practical balance; 4× is suitable when the system can still maintain its target 1% low.
Texture Detail normally has a limited effect until VRAM pressure causes streaming hitches. Use Low on restricted GPUs and Medium on systems with adequate graphics memory.
Set Shader Detail and Particle Detail to Low for the initial competitive preset. Test them in situations where they matter: smoke, molotov fire, HE explosions, weapon fire, and impact-heavy fights.
Ambient Occlusion adds contact shading and depth. It is not essential for competitive play, so Disabled is the clearest performance-first value.
High Dynamic Range and FSR
CS2’s High Dynamic Range: Quality/Performance setting is an internal rendering option. It is not the same control as enabling HDR output in Windows.
Use Quality when it does not materially affect frame time. Start with Performance on a constrained PC, then compare dark interiors, bright outdoor areas, and transitions between the two.
Keep FidelityFX Super Resolution disabled at normal competitive resolutions. Enable it only after confirming that the GPU is the bottleneck and that the extra performance is worth the softer image.
Reflex and Anti-Lag 2
Enable NVIDIA Reflex on supported GeForce hardware. Enabled + Boost can keep GPU clocks elevated and may reduce latency further, but it also uses more power and can slightly reduce frame rate.
On supported Radeon hardware, use the integrated AMD Anti-Lag 2 setting. It is AMD’s game-integrated low-latency option for CS2 and should not be treated as interchangeable with every generic driver control.
Keep the guidance vendor-specific:
- Use NVIDIA Reflex on supported GeForce systems.
- Use AMD Anti-Lag 2 on supported Radeon systems.
- Do not stack unrelated low-latency controls and assume that more switches always mean less delay.
- Compare Off, On, and Boost modes under both CPU-limited and GPU-limited conditions.
Use the in-game menu rather than forcing internal latency or scheduling cvars through an autoexec. The integrated controls can coordinate with the game’s render pipeline in ways a generic driver setting cannot.
Source 2 threading and shader cache
CS2 does not provide a supported user-facing multithreaded-rendering switch. Source 2 manages its own rendering, scene updates, streaming, and worker threads.
Do not add mat_queue_mode, -threads, or internal threaded cvars to an FPS config. Their appearance in an old guide or engine dump does not make them useful tuning controls.
Leave the graphics-driver shader cache enabled. The first session after installing a new driver may stutter while shaders are rebuilt, so routinely clearing the cache can recreate the problem instead of fixing it.
Console Commands and Your FPS Cap
The main FPS controls are available through the settings menu, but these console commands are useful for testing:
fps_max 0
fps_max 300
fps_max_ui 120
cl_showfps 1
fps_max 0 removes the in-game cap. Replace 300 with a limit suited to your PC, monitor, and latency target.
fps_max_ui limits unnecessary menu rendering, reducing heat, power use, and fan noise without affecting performance during a match.
| Goal | Cap strategy |
|---|---|
| Find maximum throughput | fps_max 0 |
| Absolute lowest input lag | Uncapped or a high cap the PC can sustain |
| Better consistency | Cap near the frame rate maintained during fights and utility |
| Tear-free VRR | Cap safely below the display’s VRR ceiling |
| Lower menu heat and noise | Set fps_max_ui to 60, 120, or the display rate |
Having FPS above the monitor’s refresh rate is not always wasted. A newer frame may become available during scanout, reducing the age of the information shown on screen, but the cost is more tearing and additional system load.
Do not assume that the in-game limiter, a graphics-driver limiter, or an external limiter is always best. Compare them using the same cap, renderer, sync mode, and benchmark route.
cl_showfps 1 is suitable for a quick check. It cannot measure 1% lows or the full frame-time distribution, so it is not enough for validating a performance change.
Best CS2 Settings for a Low-End PC
Start with the checks that can make the largest difference:
- Confirm that CS2 is using the dedicated GPU rather than integrated graphics.
- Connect a laptop to its rated power adapter and select its Performance or Turbo profile.
- Confirm that the monitor is running at its maximum supported refresh rate.
- Test 1600×900 or 1280×960 against native resolution.
- Lower MSAA, Ambient Occlusion, Shader Detail, and Particle Detail.
- Keep Dynamic Shadows on All and reduce Global Shadow Quality first.
- Enable Reflex or Anti-Lag 2 on supported hardware.
- Use FSR only when resolution testing proves that the GPU is the bottleneck.
- Set a cap the PC can maintain during smoke, fire, and multi-player fights.
Settings cannot make hardware that is below the workload’s requirements deliver a stable 240 or 360 FPS. Lower resolution may raise the average while CPU limitations, slow memory, thermal throttling, or restricted laptop power continue to hurt the 1% low.
For a maximum-performance laptop test, temporarily disable BatteryBoost, WhisperMode, Radeon Chill, battery saver, and quiet-mode profiles where applicable. These features are useful for battery life and noise control, but they interfere with a fixed performance benchmark.
Do not leave the laptop on a soft surface that blocks its cooling system. A good preset cannot compensate for sustained thermal throttling.
Launch Options: What Helps and What Does Nothing
Launch options control how CS2 starts. They do not replace sensible video settings, adequate cooling, stable drivers, or capable hardware.
| Option or command | Verdict |
|---|---|
-novid |
Startup convenience only; no in-match FPS benefit |
-fullscreen |
Useful when CS2 opens in the wrong display mode |
-freq <Hz> |
Use only when Windows or CS2 selects the wrong refresh rate |
-vulkan |
Diagnostic A/B test, not a guaranteed performance boost |
+fps_max <value> |
Valid, but the menu or console is easier to maintain |
-high |
Test only; higher process priority can harm other tasks and frame pacing |
-nojoy |
Redundant in current CS2 behavior |
-disable_d3d9ex |
CS:GO-era DirectX 9 advice with no place in Source 2 |
-threads, +mat_queue_mode 2, +cl_forcepreload 1 |
Obsolete or unsupported as CS2 performance recommendations |
Keep the startup line short. The full syntax, recovery options, and renderer testing belong in the BO5 CS2 launch-options guide.
Why Your FPS Drops or Stutters
A high average with poor 1% lows is not the same problem as consistently low FPS.
A consistently low average usually points to a sustained CPU, GPU, power, or thermal limit. Stuttering appears as individual frame-time spikes and can come from shader compilation, background programs, asset streaming, overlays, or unstable clocks.
| Symptom | Likely cause | First check |
|---|---|---|
| First match after a driver update stutters | Cold shader cache | Complete an unmeasured warm-up run |
| High average FPS but uneven motion | Frame-time spikes or background contention | P99 frame time and active overlays |
| Low GPU use with high FPS | CPU limit or active cap | Per-core CPU load and fps_max |
| Low GPU use with low FPS | Wrong GPU, power limit, or thermal throttling | Active adapter, clocks, temperatures |
| GPU stays near full utilization and latency rises | GPU bottleneck and render queue | Reflex/Anti-Lag 2, resolution, and MSAA |
| FPS locks near the monitor’s refresh rate | V-Sync, VRR behavior, or another limiter | Check every cap and synchronization control |
| Frame times are stable but players still jump | Network jitter or packet loss | Check network telemetry instead of graphics |
Do not regularly delete shader caches. That can force the game to rebuild them and bring first-run stutter back.
Low GPU utilization is not automatically a problem. Raise resolution or MSAA as a diagnostic: if GPU use increases sharply while FPS barely changes, the original configuration was probably CPU-limited.
When the frame-time graph is stable but movement or player positions still arrive unevenly, use the separate guide to diagnose CS2 net jitter and packet loss.
How to Test Whether a Change Actually Worked
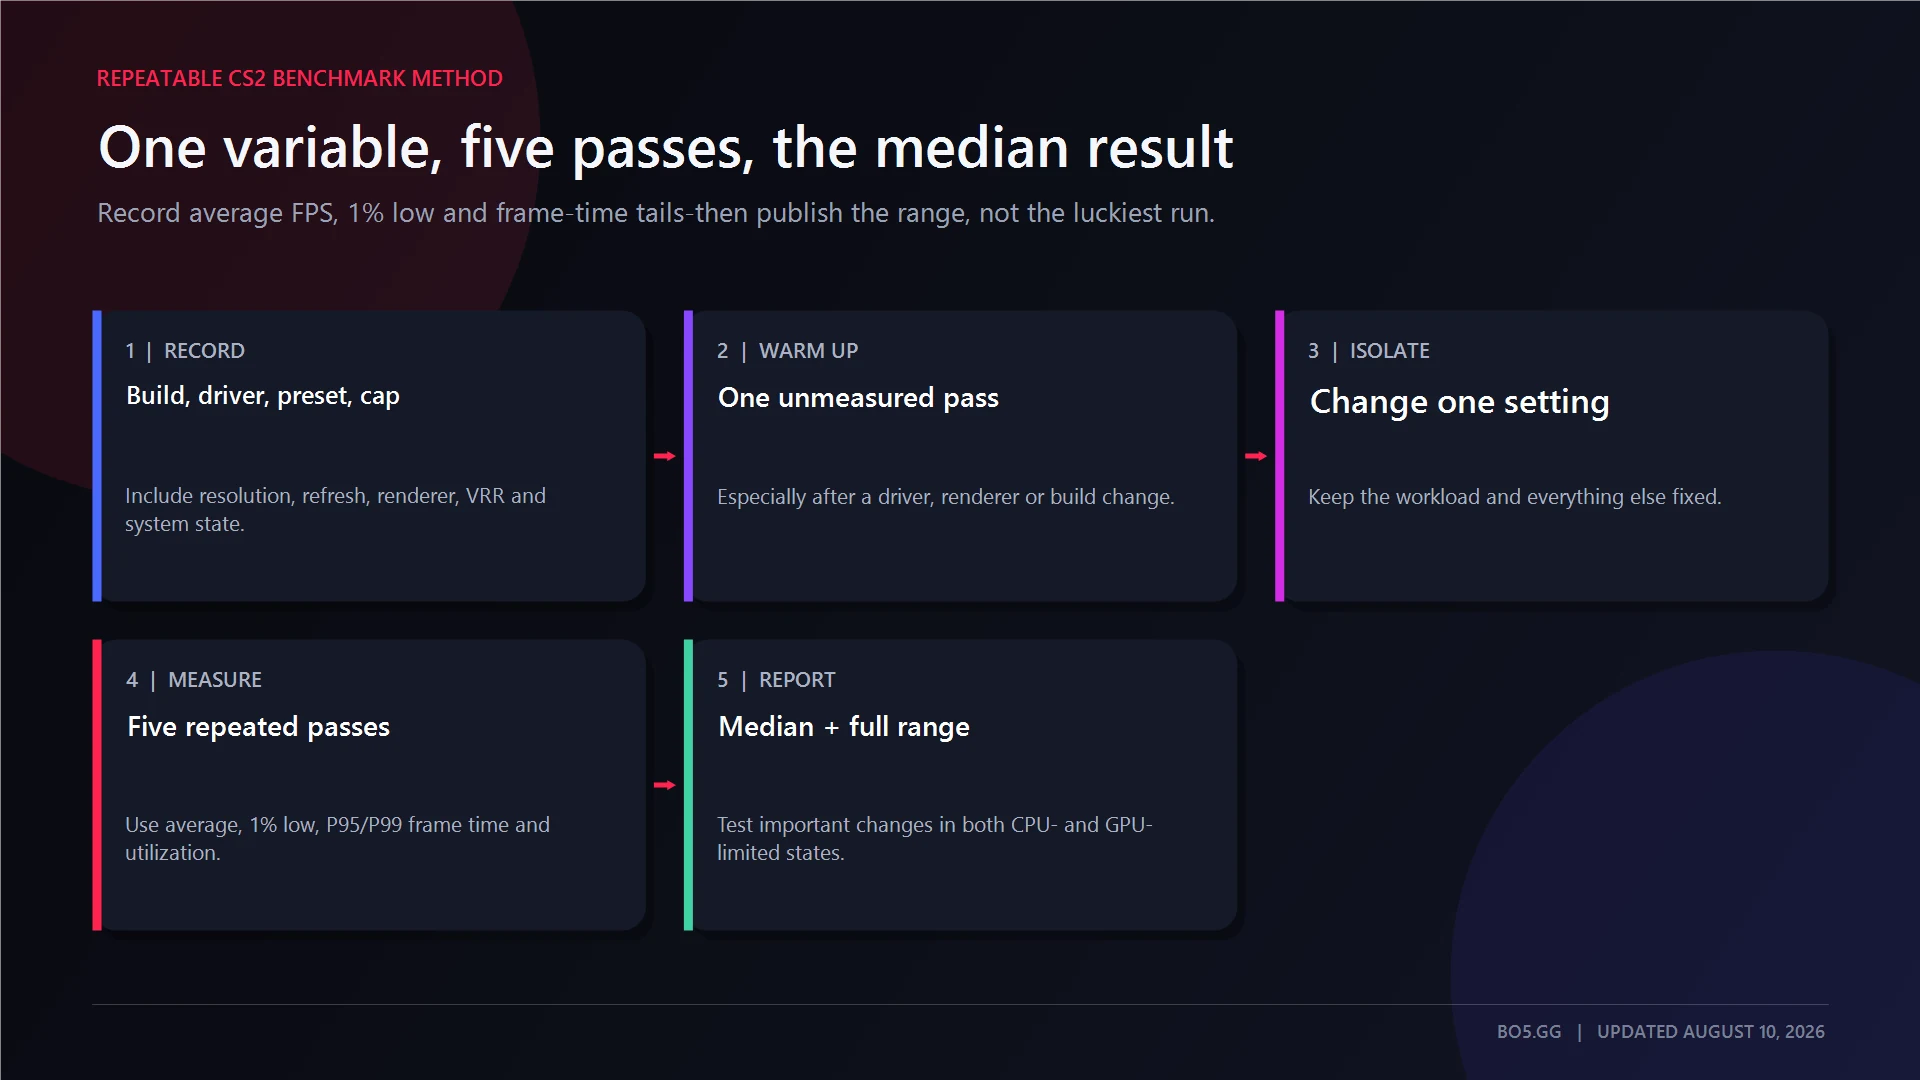
Use the same workload, system state, and measurement method every time you compare results.
- Record the environment. Note the CS2 build, Windows build, graphics driver, renderer, display mode, resolution, refresh rate, VRR state, frame cap, and complete video preset.
- Keep build information visible. Record the build watermark and system information with every benchmark.
- Use a fixed workload. A current-build demo or repeatable local route should include players, smoke, molotov fire, an HE explosion, weapon fire, and indoor-to-outdoor lighting changes.
- Warm the cache. Complete one full unmeasured run after changing the driver, renderer, or major game build.
- Change one variable. Do not compare an all-low preset with an all-high preset and assign the result to one setting.
- Run five measured passes. Use the median result and publish the range instead of selecting the fastest run.
- Record the right metrics. Include average FPS, 1% low, P95 and P99 frame time, GPU utilization, GPU busy time, clocks, power, temperatures, and per-core CPU load.
- Test two bottlenecks. Repeat important latency tests in both a CPU-limited and GPU-limited configuration.
Frame time is the time required to produce each frame. At 240 FPS, the frame-time budget is approximately 4.17 milliseconds. At 360 FPS, it is approximately 2.78 milliseconds.
A useful report should also show how much time the system spends above those thresholds. Two configurations can produce the same average FPS while one has far more visible spikes.
A demo test should be followed by a controlled live or local practice route. Demo playback does not reproduce every input, audio, networking, bot, and server-simulation cost.
The configured frame cap must also be logged. A hidden cap can flatten the result and make two settings appear equal when one would otherwise scale higher.
Driver and Windows Settings Worth Changing
Use a current stable graphics driver, but do not assume that the newest package is always faster. Keep the previous known-good installer available when a regression begins immediately after an update.
| Safe baseline | A/B-test only | Skip |
|---|---|---|
| Correct maximum refresh rate | Hardware-Accelerated GPU Scheduling | HPET and bcdedit timer tweaks |
| Windows Game Mode enabled | Fullscreen versus Fullscreen Windowed | Realtime process priority |
| CS2 assigned to the high-performance GPU | Default renderer versus Vulkan | Mass service-disabling scripts |
| Best performance mode while plugged in | NVIDIA Prefer Maximum Performance | Disabling Windows security protections |
| In-game Reflex or Anti-Lag 2 | Driver limiter versus fps_max |
Routine shader-cache deletion |
| Driver shader cache enabled | MUX or dGPU-only laptop mode | Third-party “FPS booster” packs |
| Unnecessary overlays closed | XMP/EXPO after stability testing | Old CS:GO autoexec bundles |
Hardware-Accelerated GPU Scheduling can help, hurt, or make no measurable difference depending on the system and driver. Test it with the same benchmark route instead of treating it as mandatory.
XMP or EXPO can improve CPU-limited performance when memory is running below its rated specification. It is a BIOS-level memory configuration, not a Windows FPS tweak, and should only be used after stability testing.
Do not disable Core Isolation, Memory Integrity, antivirus protection, or other operating-system security protections for a possible FPS gain. Weakening the computer’s security is not worth an uncertain performance difference.
Most one-click optimizers simply change ordinary Windows settings, close services without a clear reason, or apply registry edits that are difficult to track. Nothing in this guide requires an optimizer download.
Dial In the Rest of Your CS2 Setup
For weapon-screen coverage and legal first-person framing, pair these performance settings with the BO5 CS2 viewmodel settings guide.
Start with the preset closest to your hardware, choose the latency profile that matches your display goal, and test the game before adding more tweaks.
Once frame pacing is stable, tune aiming with the CS2 eDPI calculator and CS2 crosshair generator. You can then follow live CS2 matches and rankings without turning your config into a collection of obsolete commands.
FAQs
Why is my CS2 FPS so low?
Confirm that CS2 is using the dedicated GPU, the laptop is connected to power, and no frame cap or V-Sync setting is limiting performance.
Next, test resolution, MSAA, ambient occlusion, shadows, shaders, and particles. If lowering resolution barely changes the result, the bottleneck is probably the CPU, memory, cooling, or another system limit rather than the graphics preset.
Does lowering settings actually make you play better?
It can help indirectly. A higher and more stable frame rate reduces the delay between input and what appears on screen, while stronger 1% lows can make movement and spray control feel more consistent.
The exception is any setting that removes useful information. Player shadows are the clearest example: a small FPS gain is not worthwhile when an opponent’s shadow could reveal the peek first.
Is -high a good launch option for CS2?
Not as a universal recommendation. It requests higher process priority, which may help one CPU-constrained system but can also interfere with recording, voice software, browsers, and other background tasks.
Test it against a clean startup using the same benchmark route. Remove it when the difference falls within normal run-to-run variation. See the BO5 CS2 launch-options guide for the complete launch-option setup.
What FPS should you aim for in CS2?
First target a frame rate that remains stable at or above the monitor’s refresh rate during combat, smoke, and utility. A consistent 240 FPS is generally more useful than an average of 400 FPS that repeatedly falls below 200.
Additional frames can continue reducing frame age above the display refresh rate, but the returns diminish while power use and tearing increase.
How do I see my FPS in CS2?
Enter cl_showfps 1 in the developer console for a quick counter.
Use a proper frame-time capture method when you need average FPS, 1% lows, and stutter analysis rather than a live number alone.
Do FPS boost programs and optimizer tools work?
Most one-click boosters change Windows settings, close services indiscriminately, or apply registry edits that are hard to audit. Some also bundle advertising or software that has no legitimate reason to interact with the game.
Nothing in this guide requires an optimizer. Use CS2’s settings, official graphics drivers, Windows controls, and a reputable frame-time capture method.
Written by

Muhib Nadeem
11 published articles
CS2 writer and BO5 editor covering Counter-Strike guides, rankings, skins, and performance fixes.
Recommended posts
August 9, 2026
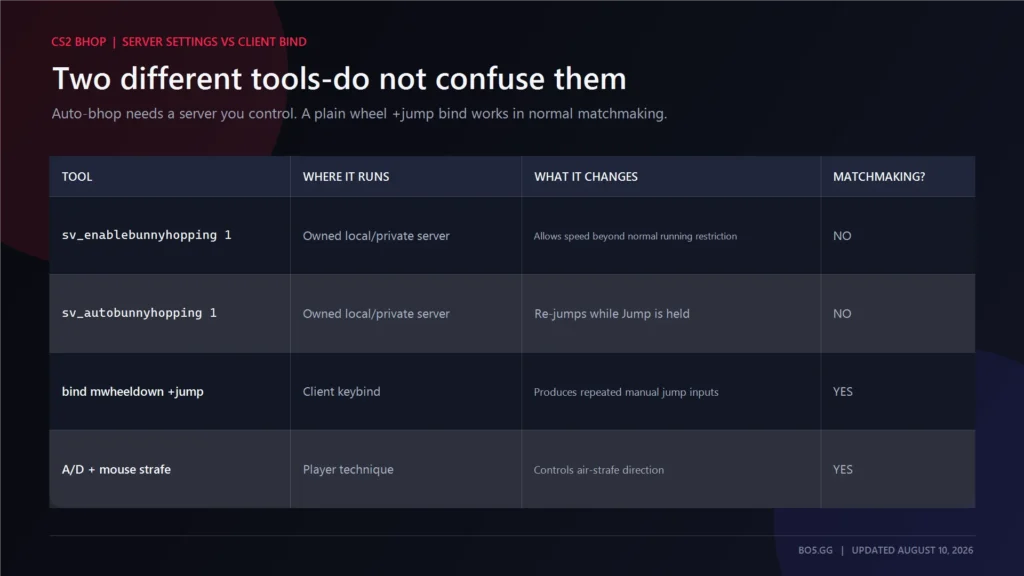
CS2 Bunny Hop Command: How to Enable Bhop
Enable auto-bhop on a CS2 server you control, adjust optional practice settings, use a matchmaking-safe wheel bind, and restore every value correctly.
August 9, 2026
CS2 Viewmodel Settings: Every Command, FOV and Pro Config
Configure your CS2 viewmodel with current commands, defaults, practical presets and dated pro snapshots—without confusing weapon FOV with camera FOV or FPS.
August 9, 2026
CS2 Wallhack Command: See Through Walls With sv_cheats
The old CS:GO wallhack command no longer works in Source 2. Learn how current targeted CS2 debug overlays work, where sv_cheats is allowed, and how demo x-ray differs.